For newer players stepping onto the hostile, spore-choked worlds of the Terminid sectors, the Eliminate Brood Commanders mission acts as a critical tactical crossroads. Available primarily on Trivial and Easy difficulties, this objective moves players away from clearing mindless swarms of Scavengers and introduces them to the complex, multi-layered threat of medium-armored elite units.
While more seasoned Helldivers view the Brood Commander as an everyday elite patrol unit on higher difficulties, this dedicated early-game mission serves as a masterclass in reading target mechanics, managing tactical resources, and practicing precise armor penetration.
Mission Logistics and Mechanics
Unlike open-ended search-and-destroy operations, an Eliminate Brood Commanders operation provides a strict 40-minute window to locate, isolate, and execute a set number of high-value targets.
The core challenge of this mission type boils down to understanding target tracking:
The Static Yellow Marker vs. Active Tracking: The yellow marker stamped on your map represents the area where the target was initially spotted or where its nest resides. However, Brood Commanders do not stay stationary. They actively patrol, covering ground up to 50–100 meters away from their spawn point.
The Radar Advantage: To bypass aimless searching, smart players leverage specialized loadouts. Equipping a light armor set with the Radar Scan perk allows you to ping your mini-map manually every few seconds. On your radar UI, a standard Terminid registers as a small, faint red dot. A designated Brood Commander, however, blinks as a noticeably larger, deeper red signature, allowing you to intercept it before it wanders into a heavy bug nest.
The Objective Tracker Rule: Random Brood Commanders will frequently appear as parts of standard patrols or defense forces around nearby hives. Killing these random spawns will not progress your objective. Only terminating the specific, marked targets identified by the mission UI will advance your progress bar toward extraction availability.
Brood Commander Data & Anatomy Breakdown
Blindly firing into a Brood Commander’s torso is a quick way to burn through your ammunition reserves and get overwhelmed. To take them down efficiently, it helps to understand their structural design and behavioral numbers.
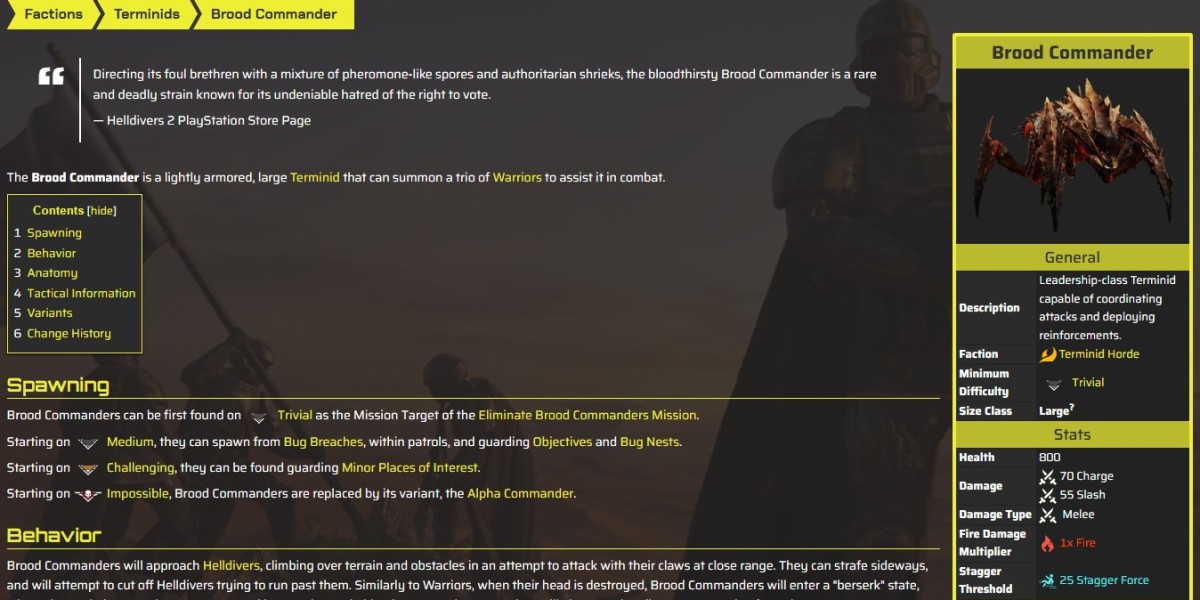
+-----------------------------------------------------------------------+| BROOD COMMANDER ANATOMY & DATA MATRIX |+---------------------+---------------+-------------+-------------------+| Part Name | Health Pool | Armor Value | Fatal Component? |+---------------------+---------------+-------------+-------------------+| Main Body (Core) | 800 HP | Level 2 | Yes || Head | 250 HP | Level 2 | Yes (Bleedout) || Front Legs (Each) | 200 HP | Level 1 | No (Maims Speed) || Claws | 200 HP | Level 2 | No |+---------------------+---------------+-------------+-------------------+A standard Brood Commander possesses 800 Main Health protected by Level 2 (Light-to-Medium) armor. Weapons with basic light armor penetration will trigger a white hit marker, meaning your damage output is instantly cut by roughly 60%. To deal 100% true damage, you need medium armor-penetrating firearms or explosive support options.
Combat Strategy: Managing the Danger Zones
When engaging a Brood Commander, players must respect three distinct operational hazards:
1. The 15-Meter Charge
If you stand out in the open at mid-range, the Commander will lower its head and initiate a heavy sprint from 15 to 20 meters away. This attack has strong tracking capabilities, and a direct impact will knock a Helldiver flat on their back, causing severe concussive ragdoll effects and stripping away a major portion of their health. The moment you see the Commander stamp its feet, prepare to dive laterally to dodge the straight-line momentum.
2. The Berserk Phase
Decapitation is not an immediate kill. The Commander's head has a low health pool of 250 HP, and destroying it triggers a fatal bleedout sequence. However, losing its head sends the bug into a headless "berserk" rage that lasts for roughly 5 to 7 seconds. During this phase, its movement speed increases dramatically, and it will blindly flail its claws forward. If a player stands still celebrating a headshot, the headless Commander will easily close the gap and shred them before dying. Shoot, decapitate, and immediately jump backward or sideways to let the bleedout clock tick down safely.
3. Reinforcement Deployment
Brood Commanders are natural focal points for bugs. When threatened, they emit a distinct, guttural screech to summon a protective trio of Terminid Warriors directly to their side. If they are left alive long enough to spray orange pheromones into the sky, they will trigger a massive Bug Breach, turning a quick execution into an extended war of attrition.
Optimized Loadouts and Tactical Execution
To breeze through this mission type in record time, your squad should look beyond standard assault rifles.
Dismemberment Tactics
Instead of aiming purely for the head, focus your fire on the front limbs. Each front leg has only 200 HP and a lower Armor Value (Level 1). Snapping a single front leg completely cuts the Commander's charge capability, while blowing off both front legs reduces its movement to a pitiful crawl, rendering its berserk phase entirely harmless.
High-Efficiency Support Gear
Bringing the right support weapons reduces the time-to-kill from minutes to seconds. The portable Machine Gun (MG-43) set to its maximum 900 RPM setting can tear through a Commander's armor in a single sustained burst. Alternatively, a single well-placed shot from an Autocannon or a couple of rapid rounds from a Grenade Launcher will blow the limbs clean off the target, killing its escorts via splash damage simultaneously.
Economy and Progression Management
Completing these missions efficiently rewards players with much-needed Requisition Slips and Experience Points to unlock higher-tier stratagems. While playing, map exploration will reveal hidden minor points of interest containing precious Super Earth currencies. To streamline your cosmetic and premium unlocks, players often use platforms like U4N to easily purchase helldivers 2 super credits, enabling them to bypass the long grind and immediately acquire high-tier premium Warbonds containing advanced gear like the JAR-5 Dominator or the SG-8S Slugger, both of which stagger and destroy Brood Commanders with absolute ease.