Introduction
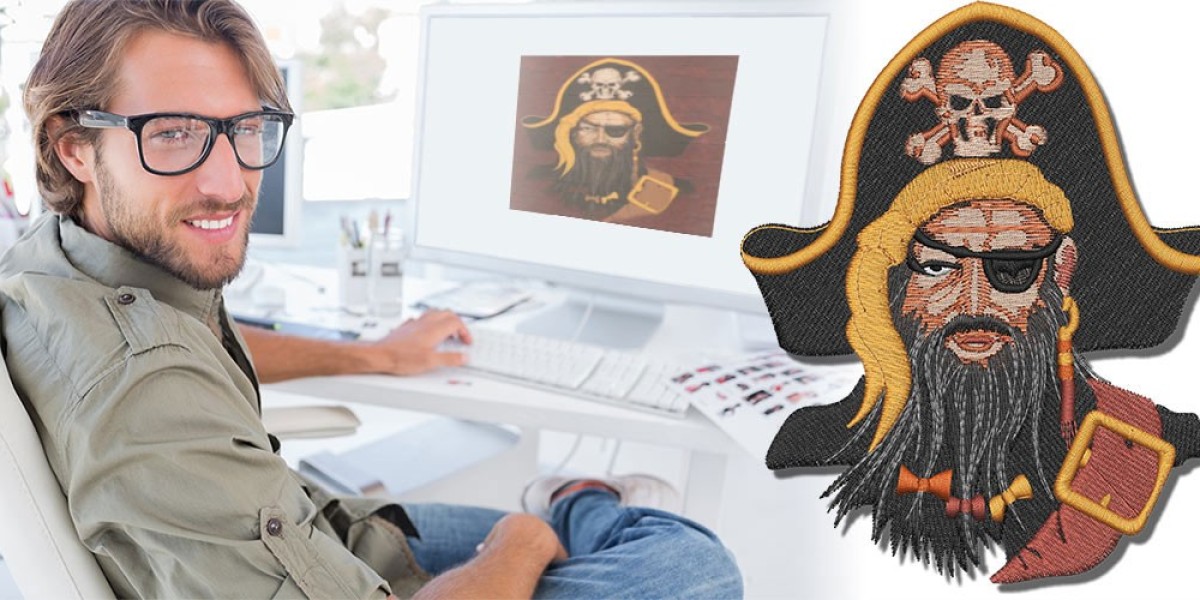
You’ve got a logo or graphic that looks fantastic on screen—a crisp brand mark, a fun team mascot, or a custom illustration—and you know it would look even better stitched on polos, caps, or hoodies. The only problem? Your embroidery machine speaks PES, and that JPG or PNG file on your desktop isn’t going to cut it. That’s where professional JPG to PES digitizing services step in. These specialists take your image and turn it into a stitch-ready PES file that runs cleanly, looks sharp, and holds up wash after wash. If you’ve never used a digitizing service before, the process can feel a little mysterious. What exactly do you get? How long does it take? What should you send them? This guide breaks down everything you can expect so you know what good service looks like and how to get the best possible results for your next project. JPG to PES file conversion is where the magic really starts.
The Difference Professional Digitizing Makes
Anyone can run an image through a free online tool and get a basic PES file, but the results often look flat, puckered, or full of thread breaks. Professional services use high-end software and years of hands-on experience to build files that actually run well on real machines. They add proper underlay so stitches sit proud instead of sinking, adjust density so fabric stays soft, and apply pull compensation so shapes don’t distort on knits. The difference shows up in small details: clean satin edges, even fills, hidden trims, and a back that looks tidy instead of messy. Clients notice—and they remember brands that look polished.
What You Should Send the Service
Most pros ask for the same things. A high-resolution source file is non-negotiable—300 DPI minimum for raster images (JPG/PNG), or better yet the original vector (AI, EPS, SVG) if you have it. Send the exact size you want the final logo stitched (e.g., 3.5 inches wide for left-chest placement). Tell them the garment type (pique polo, performance tee, fleece hoodie) and any thread preferences (Madeira, Isacord, Robison-Anton). If you have specific colors (Pantone numbers help), include them. The more information you provide upfront, the fewer back-and-forth emails and the faster you get a file that stitches perfectly the first time.
Typical Turnaround Times
Standard turnaround for a single logo is usually 12–48 hours, depending on the service and complexity. Many shops offer rush options (4–8 hours) for an extra fee when you’re facing a tight deadline. Larger orders—say 10+ different logos or names—may take a little longer but often come with bulk discounts. Good services communicate clearly: you get an ETA when you place the order, updates if anything delays, and a notification the moment the file is ready.
What the Finished File Includes
A professional service rarely sends just one file. Expect multiple sizes baked into the same PES (common sizes: 2", 3", 3.5", 4" wide) so you can switch placements without re-digitizing. Many include a stitch-out preview (a small stitched sample on fabric mailed to you) or at least a high-res 3D render you can spin on your phone. You’ll usually get a thread chart listing exact color codes so you can match cones perfectly. Some services also send the working file (in their native format) so you can make future tweaks yourself.
Quality Checks You Should Expect
Reputable services stand behind their work. They run tests on their own machines before sending the file. Look for guarantees like “free revisions until it stitches perfectly” or “redo at no charge if it doesn’t run clean.” Good digitizers ask questions if something’s unclear—garment type, stabilizer preference, puff or flat—and they don’t just auto-digitize and call it done. They manually add underlay, adjust density, fix jumps, and balance pull compensation so the logo behaves on real fabric.
Pricing and What You’re Really Paying For
Pricing varies widely. A simple left-chest logo typically runs $20–$50. More complex designs—small text, gradients, puff effects, or multi-color illustrations—can go $60–$150. Rush fees add $20–$50 depending on speed. Bulk orders (10+ designs) usually get discounts. You’re paying for experience, testing time, revisions, and the guarantee that the file will run without issues. A $30 file that stitches clean on the first try saves far more than a $10 file that needs three re-dos and wastes blanks.
How to Spot a Quality Service
Look for clear communication: fast responses, specific questions about your project, and realistic ETAs. A good service shows examples of their work on similar garments. They offer previews (3D renders or stitch-outs) before final delivery. Unlimited free revisions until you’re happy is a strong sign. Avoid places that charge per 1,000 stitches without seeing the design first or that promise 2-hour turnarounds on complex logos—those usually cut corners.
Common Results You Can Expect
With a solid service, your logo should stitch with even tension, no puckering on knits, clean satin edges, minimal visible jumps, and a tidy back. Text reads clearly at 3–4 inches wide. Colors match your Pantone or thread chart. The design sits flat between the placket and shoulder seam without leaning or crowding buttons. On performance fabrics, it stretches without distortion. On fleece, it sits proud without sinking.
Conclusion
Professional JPG to PES digitizing services take the guesswork out of getting your logo stitched perfectly. You send clean artwork and details, they return a file that runs smoothly, looks premium, and builds brand consistency across every garment. The time, thread, and blanks you save far outweigh the cost.
Next time you need logos on shirts, caps, or jackets, skip the trial-and-error. Send your artwork to a trusted service and watch your brand come to life in thread. Clean files mean confident stitching—and that’s how you turn a simple logo into something people remember.